ProClip Opel Insignia B 18-22 (extra strong )

article number
213549
Not in stock
€76.95
-
+
Details
Extra strength mounting platform for installation of heavier devices. You can keep your device in a holder or attach it directly onto the mounting platform. The placement is optimized for touch screens, PDAs, taximeter screens and printers. You will have your device within easy reach, safe and convenient! The installation is quick and easy and will not damage the interior. Detailed installation instructions included.
More Information
More Information
Accessory brand Brodit
Barcode 7320282135492
Recommended retail price incl. VAT 75.95
Type ProClip left hand, Extra strong
Position Middle of dashboard
Color Black
Product suitable for Proclip
Reviews
Write Your Own Review
You're reviewing:ProClip Opel Insignia B 18-22 (extra strong )
Compatibility
Instruction
Please read the instructions and look at the pictures carefully before installing.
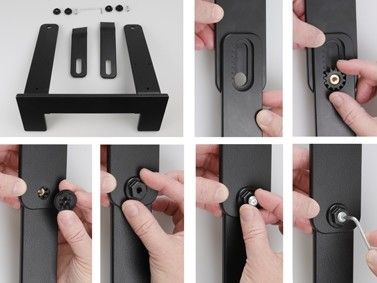
This mounting bracket consists of three parts:
Part 1: Mounting plate (the largest part)
Part 2: Short support arm
Part 3: Long support arm
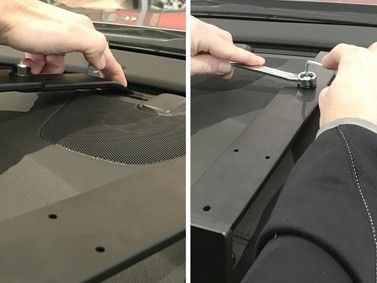
1. Place Part 2 under the left end of Part 1 and press it into place. Press the cog wheel into place on the underside. Press the lock nut into place on the top, so the teeth fit in the cog wheel. Put the screw into place and fasten it without tightening. Place Part 3 under the right end of Part 1 and press it into place. Press the cog wheel into place on the underside. Press the lock nut into place on the top, so the teeth fit in the cog wheel. Put the screw into place and fasten it without tightening. Pull out the support arms to maximum length.
2. Press the thin end of the enclosed gap opener into the gap between the air vent and the dashboard to widen the gap on top of the dashboard. Hook the angled lower parts of Part 1 under the dashboard overhang. Press the angled edge of Part 2 and Part 3 into the gap next to the gap opener so the support arms are resting on the dashboard. Press the support arms into Part 1 so they get shorter and the mount is in held in place. Pull out the gap opener.
 
3. Lock the mount into place by carefully tightening the lock screws alternately. It is important not to tighten the screws too hard. When the mount is firmly in place, lock the position with the enclosed Allen key. 
4. The product is in place.

Scroll to top