Brodit fixed install. h/c Apple iPhone 12/13 mi 62-77/6-10mm

article number
527502
In stock
€104.95
-
+
Details
NOTE! It is important to slide the device STRAIGHT DOWNWARD into the holder, and to slide it STRAIGHT UPWARD out of the holder.
 
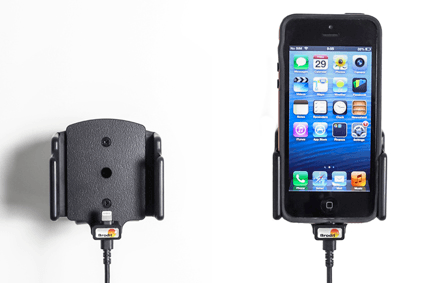
Use an active holder for your iPhone on the road and you will always have a freshly charged battery! In addition, you will always have your iPhone within easy sight and reach. Safe, comfortable and convenient! The active holder is to be connected inside the dashboard. It provides an elegant installation without any cables hanging over the interior. The holder has a neat and discreet design which blends well with the vehicle's interior. Your iPhone is held securely in place in an upright position for maximum cellular reception.
 
When you place the iPhone in the holder, it automatically connects to the charging unit. 12 Volt. The product is E-approved. Connect the power cable with a 2 A fuse. Professional installation recommended.
 
The holder is made of black ABS plastic and has a perfect fit. It is easy to put the device into the holder, and just as easy to take it with you when leaving the vehicle.
 
Fits devices with "standard" sized skins (not rugged or slim size). Fits devices with skin that has the following dimensions: Width: 62-77 mm, Thickness: 6-10 mm. (May fit for skins thicker than 10 mm, depending on shape/design of the edges).
 
The holder is equipped with a tilt swivel so you can adjust the angle of your device in order to avoid light reflection on the screen. You can tilt the holder 22° in each direction. Attach onto ProClip Mounting Platform.

This product supports Qualcomm QC 2.0 quick charge (provided the device supports Qualcomm QC 2.0 quick charge).
More Information
More Information
Accessory brand Brodit
Barcode 7320285275027
Recommended retail price incl. VAT 110.95
holder characteristic Toestelspecifiek, Verstelbaar
Toestel connector lightning
Device with or without cover ja
Device holder width / height 62-77 mm
Toestel houder diepte / dikte 6-10 mm
Cable / charger type / connnector Molex, fixed install
Input Voltage 12/24V geschikt
Voltage (output) QC - QuickCharge
Max Amperage 3,0 Amp
Montage standaard AMPS
Device holder lockable? no
Color black
Productinfo Brodit houder
Product installation Mount the holder on a ProClip in your vehicle. A detailed installation manual is included in the product packaging
Product suitable for Brodit houder
Exchange period 30 days
Repair period 30 days
Return period 30 days
Reviews
Write Your Own Review
You're reviewing:Brodit fixed install. h/c Apple iPhone 12/13 mi 62-77/6-10mm
Compatibility
Related products
Instruction
Please read all of the instructions and look at the pictures before attaching the holder. Connect to a 2 A fuse holder and fuse inline with the Red wire close to the power source. Route the cable from the holder into the vehicle dashboard and secure the charger unit in place. Ensure the charger unit is securely mounted behind the dashboard in a well ventilated area that does not get hot! Route the power cable from the charger unit to the power supply source in the vehicle and connect as follows: 1. Connect the White wire to a Negative Ground connection of the vehicle or the vehicle chassis.
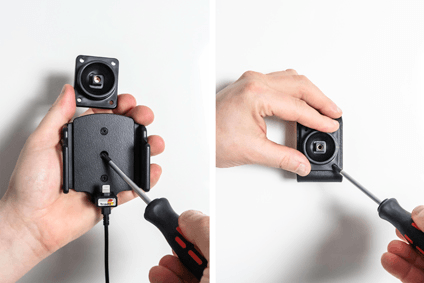
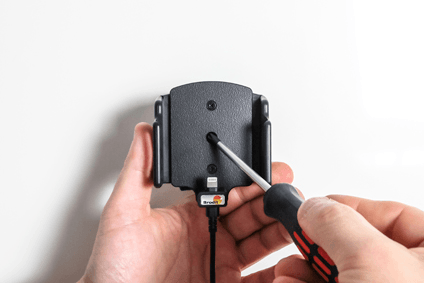
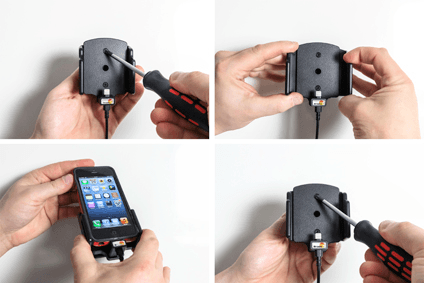
2. Connect the Red wire to a 12 Volt power supply in the vehicle that is controlled by the ignition switch of the vehicle. Attaching the holder: 1. To adjust the holder for your device: Loosen the screws on the front side of the holder, so the sides of the holders can be adjusted. Place the device in the holder and press the sides together so the device is firmly in place. Tighten the screws on the front side of the holder. 2. Loosen the screw in the center of the holder so you can remove the tilt swivel attaching plate on the back. Place the attaching plate onto the desired position. Screw the attaching plate into place with the enclosed screws.
3. Place the holder over the attaching plate so the screw fits in the hole in the tilt swivel. Screw a few turns on the screw, just so the thread starts to pull. Pull the holder toward you and hold it slightly tensed, in the same time tighten the screw so the holder is pulled toward the tilt swivel. Tighten the screw firm at first, then loosen it a bit so the holder is firmly in place, but still can be adjusted. NOTE! It is important to slide the device STRAIGHT DOWNWARD into the holder, and to slide it STRAIGHT UPWARD out of the holder.
4. The holder is in place.

Scroll to top